Local AI generation these days is pretty easy, with a lot of easy to install and use tools to get started. But first, a little info about hardware needs and expectations.
HARDWARE INFO
The most important hardware need is a good GPU. Local models work by having a bunch of data indexed, and for efficiency of indexing it needs a lot of cores, not necessarily fast cores, but just a high quantity. An average CPU in 2025 has 8 cores, maybe 12-16 threads. A mid range GPU has 2000+ cores.
While you can run Local LLMs on only a CPU, the output time will be MUCH slower, by a factor of 4x or more. If you are very patient, or are looking to test things out, that might be fine, but for any sort of production work, just spend the $20 a month and get an ChatGPT or Claude subscription.
Beyond the simple core count, even more important, and the thing to look into when looking to acquire a GPU for AI generation is VRAM – You can always offload some of the model to your system memory, but then your cpu will be involved passing the data again, which is the slow part. A GPU with lots of VRAM can store bigger models in its internal memory, with no processing delay between its processing unit and the memory, allowing for quick generation.
A final X-factor to mention is the use of CUDA – NVIDIA is big right now because CUDA has a stranglehold on GPU coding, and its only really available for NVIDIA GPUs. There are ways to emulate it for other GPUs, like the offerings from AMD and Intel, But while AMD and Intel provide much better bang for the buck in terms of VRAM, NVIDIA GPUs will trounce them on generation speed. BUT if you want to run bigger, more intelligent models, you could spend $3k and get 3 AMD 7900xtx, providing a total of 72gb of VRAM allowing you to run a 70b or even a 92b model comparable to consumer AI coding options like ChatGPT, or you could spend $3k and get a single nvidia RTX 5090 and get only 32gb of VRAM, letting you run 32B models (it could do a 40b model, but those aren’t a common model size)
That all being said, you don’t need to spend thousands on hardware to get usable AI inline code suggestions. Many local LLM specific inline coding models target 7-10b, which you can easily support with a GPU with 8-12gb of VRAM. Something like the RTX 3060 comes with 12gb of VRAM and you can get them new for under $300.
Why Local LLMs
With the high hardware prices, and worse results than a consumer model like claude sonnet or openai’s chatgpt, running a model locally might seem like a bad call, but there are a few good reasons to give it a shot:
- The big models won’t always be this cheap. We are living in the “early netflix” stage of AI generation. Its long term unsustainable, and models will very likely raise in price down the road.
- Giant models are slowing down in terms of intelligence gains. There is only so much data to use, and not all that data is great. Smaller LLMs are still making great strides and improving rapidly. They will never reach or match the current iteration of the big consumer models, but they don’t need to to provide usable code.
- As time goes on, GPU power will be cheaper to buy, and good models easier to run. Learning the process now will allow you to swtich when it makes sense to you.
AI GENERATION HOW TO
We will start with basic text generation tools, which we can easily adapt to do inline code generation.
While there are tons of headless options for LLM’s, I always prefer a GUI when learning a new tool, and I highly recommend LM Studio: https://lmstudio.ai/
It has many useful features:
- Chat window that feels similar to ChatGPT
- Developer window showing logs, providing API details, and allowing you to set model specific settings.
- A model directory that allows you to search for new models directly, and download/use them without any further tinkering.
- Easy updates and automatic partitioning of resources.
- Available for windows, linux, and macos.
So to get started, just download and install the software. Once it is open, in the bottom left corner, switch it from “User” (which just has a chat window mostly) to “Developer” – this will give you access to the model explorer, as well as to the API tools.
Once you have the developer mode on, go to the left sidebar, and hit the magnifying glass icon. This will bring you to Mission control, where you can search for models.
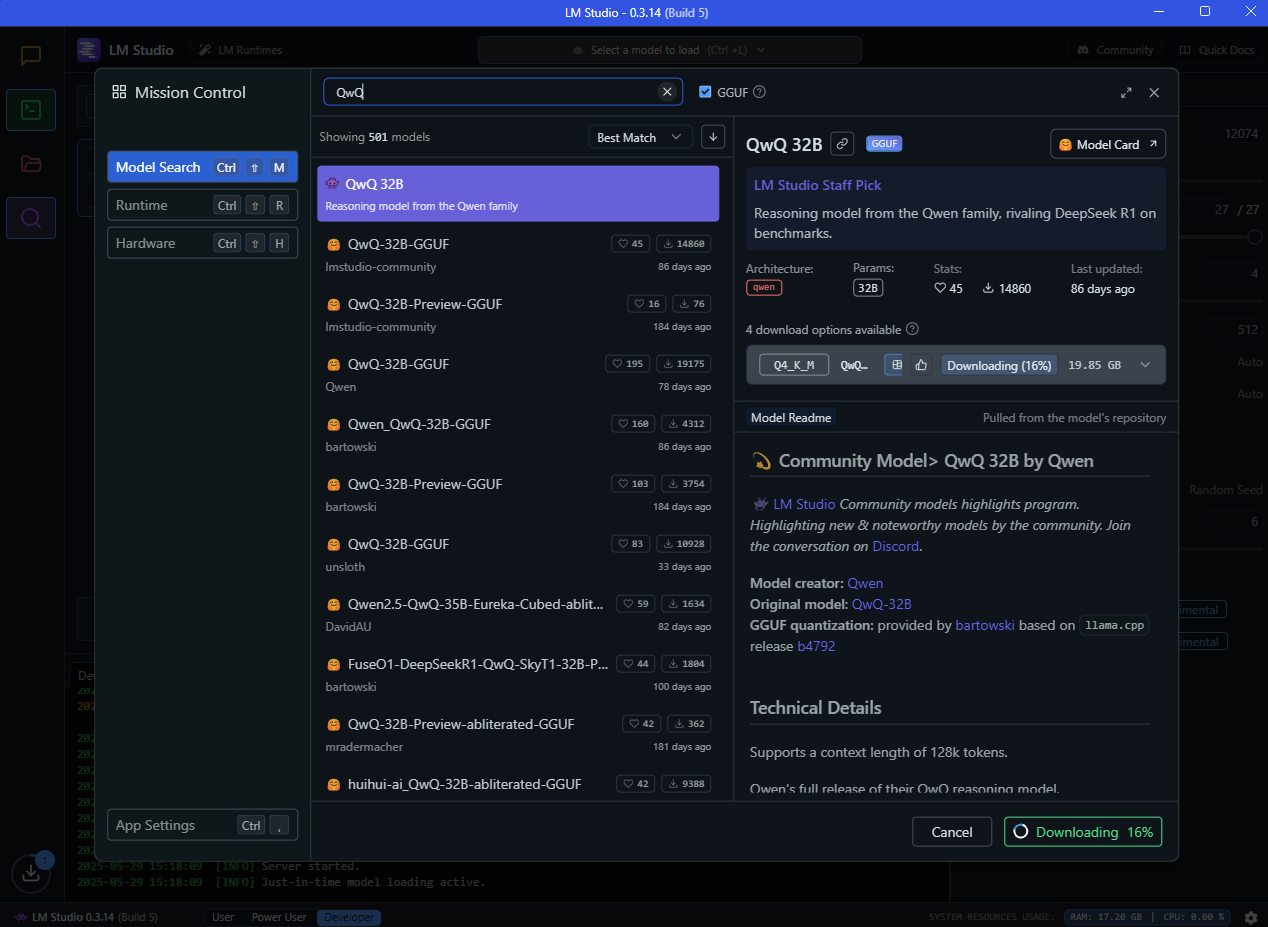
MODEL SELECTION
AI Models are always changing, there are hundreds of developers pushing out LLM models, and offshoots of those LLM models. It is very difficult to figure out what models are best, and benchmarks can only go so far. Its worth searching places like reddit for recent posts to get a general community consensus on what models to try out, however, there are benchmark options that help provide guidance:
https://huggingface.co/spaces/mike-ravkine/can-ai-code-results
https://aider.chat/docs/leaderboards/
https://prollm.toqan.ai/leaderboard/coding-assistant
They do tend to get flooded with the consumer level models like ChatGPT, but you can find usable models in these lists that will provide a good place to start.
I recommend trying something like the latest Qwen model in the highest model size your GPU will support. They are continuously updated, and provide a good local generation experience.
A 14b model is probably around 9-10gb, and these models will have to live on your hard drive, so make sure you have the hard drive space to support your models.
Once you have your model downloaded, you can go into the chat window of LM studio – the top search bar will bring up your list of models. Select the one you want, and hit Load model. Once it is loaded, try asking it a question. If it responds, you are successful! and you can start using it.
INLINE CODING
Next, we need to get inline coding working. open up the developer tab, and you should see something like this.

By default, the API should already be set up, but this page is where you can turn it on if necessary, and view/update your settings.
The most important thing to find is your port number. This is important for when we set up inline coding through your local LLM.
Next, you will want to go into your IDE, and find and install the “Continue” extension. It should be available in most major IDE’s – its available in both jetbrains and vs code.
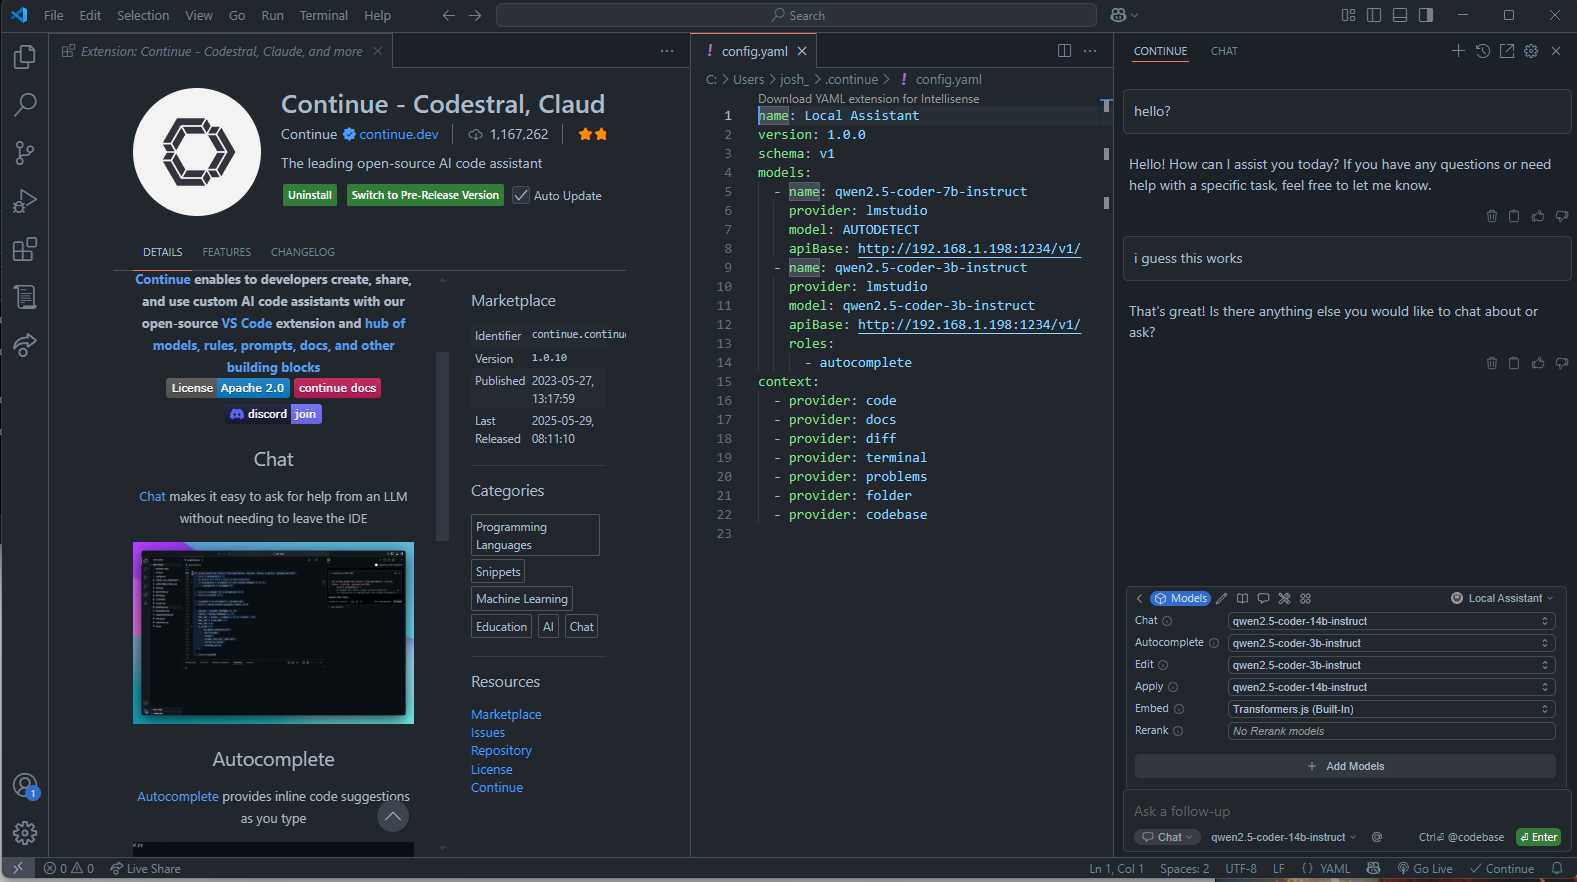
Continue adds a little “continue” button in your bottom right. click on that, and click open chat.
Right above the chat bar, there is a small toolbar, the little cube will bring up your model list. on the right, there will be a dropdown with probably just “New Assistant”, but possibly “Local Assistant” – we want local assistant for now. click on the settings wheel next to the selection, and it will open a config.yaml file. You will want to add your models there that you want to use.
Example:
name: Local Assistant
version: 1.0.0
schema: v1
models:
– name: qwen2.5-coder-7b-instruct
provider: lmstudio
model: AUTODETECT
apiBase: http://192.168.1.198:1234/v1/
– name: qwen2.5-coder-3b-instruct
provider: lmstudio
model: qwen2.5-coder-3b-instruct
apiBase: http://192.168.1.198:1234/v1/
roles:
– autocomplete
context:
– provider: code
– provider: docs
– provider: diff
– provider: terminal
– provider: problems
– provider: folder
– provider: codebase
You will note from my screenshots, I don’t use the IP address that LM studio says its reachable at. Your mileage may vary, but I had to get my local 192 ip, not the 169 ip LM studio provides. additionally, its important to add the /v1/ – lm studio expects that.
Once things are configured correctly, your models list should show your list of models. Make sure your Chat, autocomplete, edit, and apply models are set how you want them. You can use the same model for everything, or you can use a bigger model for chat, and a smaller quicker one for autocomplete.
You may have to take an extra step to disable whatever inline coder you currently use, and enable continue.
But once this is set up, things should begin autocompleting!
Further interesting AI things
If you are like me, you probably have a high standard for code generation, but a much lower standard for Image and Voice, but they are much funner to play around with. There are a few good options
For image generation, stable diffusion web UI is a great place to start. Last I tried, it was pretty easy to set up:
https://github.com/AUTOMATIC1111/stable-diffusion-webui
However, a newer tool that looks pretty interesting is ComfyUI – which handles images, video, and audio, with an interesting userflow using nodes
For us coders, it might be more confusing than stable diffusion, but for a regular user it might be easier.
Image models are different than text generation. Instead of using “Models” they use “Checkpoints”. These are basically the models, and give you a rough idea of what kinds of images they make.
To further refine the images, you use something called “Loras” these are basically mini model plugins. You might compare them to filters.
A good place to search for these types of objects are https://civitai.com
For audio generation there are tons of options, but not many GUI’s. I’ve tried tortoiseTTS, and have been recommended this one:
https://github.com/SWivid/F5-TTS
But your mileage may vary.
Hopefully that was an interesting dive into Local AI generation! It is worth playing around with, even if your hardware is limited.